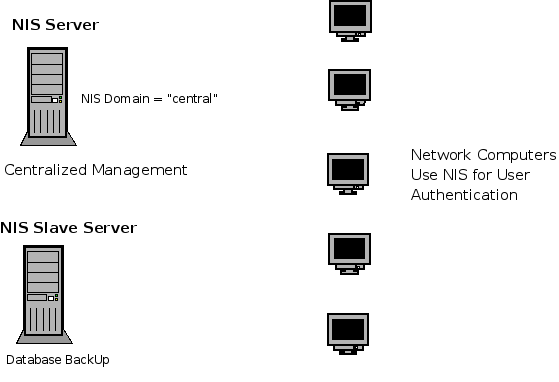
The Network Information Service distributes information on the network that must be shared between the Linux machines. Sun Microsystems developed a system known as Yellow Pages (YP) that eventually became known as NIS. The original YP is added to most commands for NIS ypserver, ypbind, and yppasswd. Typically NIS is used to distribute information about the users and how they authenticate to Linux. Specifically, /etc/passwd and /etc/group. NIS provides a means to central administration of the network users. When a user logs into a system using NIS, the system first checks the local /etc/passwd file , if it cannot find the user it will then check the NIS server. If you are looking for videos or training on NIS see our Online Server Courses.
The structure used for NIS is the normal client-server setup . The configuration for NIS uses a domain that is used to indicate a group of systems on a LAN or subnet. Each of these systems on the domain will use the same map, which refers to a common database. These databases are stored in a DBM format which is based on ASCII text files.
Each NIS domain needs to have a NIS server that acts as a information base for the domain. The NIS clients will query the NIS server for information that they will need. Maps are the information that is stored in the database.
You can divide the NIS servers into masters and slaves to provide a level of redundancy for the maps. The slave will maintain a copy of the maps and will update fro the master whenever a change is made. The program that notifies the slave of any changes is yppush
There are four basic topologies used for NIS:
1.single domain – one master no slaves
2.single domain with slaves – one master, one or more slaves
3.multiple domains – each domain has a master but no slaves
4.multiple domains with slaves – each domain with a mast and one or more slaves
It only makes sense that if you are really interested in having NIS work right you will need at least one master and one slave as a backup.
Configuring a NIS server
Install the necessary applications.
yum install yp-tools ypbind ypserv portmap
Set Up the Domain Name
Use this command:
nisdomainname mydomain
You can est to see if the domain is active by using the command without the argument.
nisdomainname
Configure the Server Daemon
The two configuration files are /var/yp/securents and /etc/ypserv.conf.
The default settings for /etc/ypserv.conf are:
dns: no
*:shadow.byname:port : yes
*:passwd.adjunct.byname : port : yes
*:*:none
Edit /etc/yp.conf
domain central 192.168.5.95
In this example “central” is the name of the domain and the IP Address is the IP of the NIS server.
Configure the Security
The /var/yp/securenets allows access to the NIS only to those networks listed.
255.255.255.255 127.0.0.1
255.255.255.0 192.168.5.0
This example will allow the local host an all computers on the 192.168.5.0 network.
Edit /etc/hosts.allow
PORTMAP: 192.168.5.0
This allows the network to have access to portmap.
Start the Server
Before starting the server make sure portmap is running by issuing the command:
service portmap start
You can use either start/stop/restart/status. Yo can also use rpcinfo to see information.
rpcinfo -p localhost
Create Databases
The command that is used to initiate the database is ypinit and will create maps for the system and place them in /var/yp and list them under your domainname. The files that will be included in your maps are:
/etc/passwd
/etc/group
/etc/hosts
/etc/Networks
/etc/services
/etc/protocols
/etc/netgroup
/etc/rpc
The database is created with this command:
/usr/lib/yp/ypinit -m
When you initialize the maps you will need to know what slave servers you may want to enter as those names can be added at the time of the database creation. Specify the hostname and any slave and then use Ctrl+D, select “y: and it is complete.
The -m of the command tells NIS that the database is created for the master server.
Once the slave has been set up as a client you can add the database from the masterserver with this command:
/usr/lib/up/ypinit -s masterhost
This tells NIS to get the database from the masterhost server.
Start NIS Password Daemon
yppasswd allows users to update their information than then it is propagated to the master server and slaves. yppasswd will only run on the master server. Start the master server yppasswd with this command:
/etc/rc.d/init.d/yppasswdd start
By default NIS users cannot change their full name or login shell. However, these can be allowed by starting yppasswd with these arguments:
yppasswdd -e chfn
This allows full name changes.
yppasswdd - chsh
This will allow shell changes.
Transfer Maps to Slaves
The command ypxfrd is used to transfer maps to slave servers. Once the slave receives information that the master has changed the slave will start ypxfr to read the new map. To speed up the process issue this command
/etc/rc.d/init.d/ypxfrd start
If you need to update a map run make in the /var/yp directory of the master server and this will update maps and propagate them tot he slave servers.
Starting NIS Servers at boot
You need to make changes permanent and make them so they are available at start time. Open /etc/sysconfig/network with a test editor and add a line:
NISDOMAIN=mydomainname
mydomainname must be the name that you have chosen.
Now open a terminal and use chkconfig.
chkconfig –level 35 yppasswd on
Adding Users to the Database
Add a user with the normal commands and password set up.
useradd jim
passwd jim
Move into the /var/yp directory and run make.
cd /var/yp
make


{ 2 comments }
Does /var/yp/securenets have to be created on the slave NIS server?
If so, is it updated when the master server is updated?
In order to get the update to work you will need to configure the Slave…it will need to pull the maps from the Master.