Set Up NIS Clients
The NIS Server-Client relationship requires that you set up a client in order to work with the NIS server. This will enable you to login on the client from a user and password located on the database of the NIS server. The client machine will first look in the /etc/passwd file and then check the database on the NIS server.
Here you can find how to set up the NIS Server. If you are looking for videos or training on NIS see our Online Server Courses.
The first step is to set up the NIS domain with this command:
nisdomianname mydomain
This is the same as the server set up. The next step is binding the client to the server. The client uses a daemon called ypbind with the configuration file /etc/yp.conf to connect the client and the server. One method to make this happed is to edit /etc/yp.conf on the client and add this line to the file:
ypserver 192.168.5.95
Of course, make sure you put the IP Address of yoru server there. Another method is to allow the clients to broadcast for the domainname server with this line:
domain mydomain broadcast
Finally, another method is to add the servers whether they are masters r slaves on the domain in the same file. Use the format:
domain mydomain server 192.168.5.95
domain mydomain server 192.168.5.2
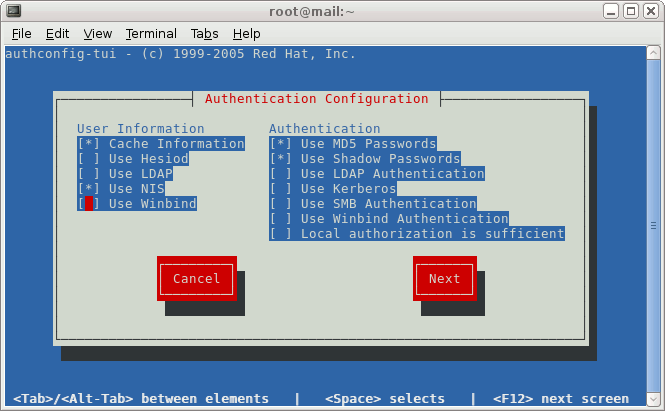
This lists the servers on your domain. You can also use the authconfig tool to set up NIS on the client. Open a terminal and type authconfig-tui as root.
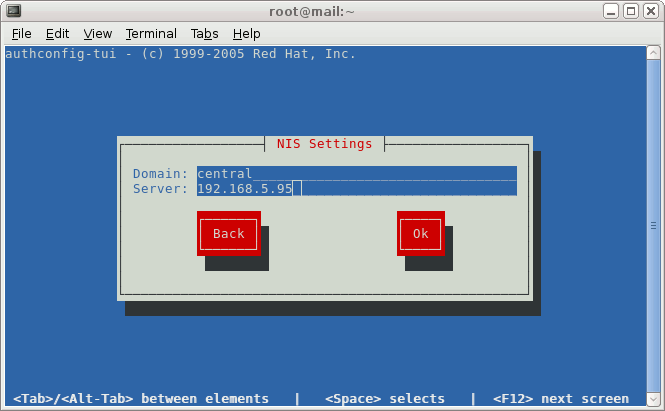
Once the program opens check the Cache Information as this will speed up access in the future. Then check the NIS check box. Type in the domain name and the server IP. Now click next and make sure Use Shadow Passwords and Use MD5 passwords are checked and click next.
Now enter the name of your domain and the IP Address of the NIS server.
Your client should start looking for the NIS server.
Now you need to set up the client so that ypbind starts at boot.
Make sure it is running correctly:
rpcinfo -u localhost ypbind
It should say:
program 100007 version 1 ready and waiting
program 10007 version 2 ready and waiting
Now try out a NIS command to see if it is working and the server is talking to the client. Use this command:
ypcat passwd.byname
This should return a list of the names in the database, even though they are encrypted.
Make sure you edit /etc/host.conf on the client to reflect a change in hostname lookups. Change the line so it looks like this on the client:
order hosts,nis,bind
Finally, edit /etc/nsswitch.conf so that you can add standard NIS lookups when info is requested. Make the line look like this:
passwd: files nis
shadow: files nis
group: files nis
hosts: files nis
Make sure NIS will start at boot wit this command:
chkconfig –level 35 ypbind on
Commands Description
nisdomainname Set a NIS domain
ypserv Server activities
ypinit Build and install NIS database
yppasswd Process user password changes
ypxfrd Speed up transfer of maps
yppush Propagate maps to slaves
/var/yp/securenets Hosts permitted to access maps
/etc/ypserv.conf Special host access
ypwhich Display master server
ypcat Print NIS entries in database
yppoll Display server and version of NIS map
ypmatch Print value of entry map
/etc/yp.conf Client configuration file
/etc/nsswitch.conf Configure system name database lookup
/etc/host.conf Configure hostname resolution


