Inkscape is a Free and Open Source alternative to Adobe Illustrator and other vector graphics packages. First released in 2003, it aims to fully implement the Scalable Vector Graphics (SVG) 1.1 standard and has been making strong progress towards that.
You’ll fine Inkscape in pretty much every Linux distro software repository, so installing it is a breeze. You can also run Inkscape on Windows, Max OS X and other Unix-like operating systems.
What does Scalable Vector Graphics mean? In a word: drawing. Where Gimp specializes in photo editing (i.e you have a pre-existing photograph or complex image to edit), Inkscape gives you the tools to create complex and stunning pictures from scratch. It also has a range of import options should you have an image you want to amend.
As ever, getting the right tool for the job is important if you’re to avoid frustration.
Inkscape is a powerful tool, and that power leads to a certain amount of complexity. Don’t expect to unlock all its potential in a few minutes, or even hours. If you are looking to do something simple – such as a basic flow chart – then LibreOffice Draw may well be a better bet.
Getting started
Starting up Inkscape for the first time, you’ll see a fairly uncluttered interface. On the left you have buttons to create your drawing: shapes, lines, bezier curves, spirals and so on. Click on one of these and you’ll see further options relating to that choice at the top left (below the pull-down menu).
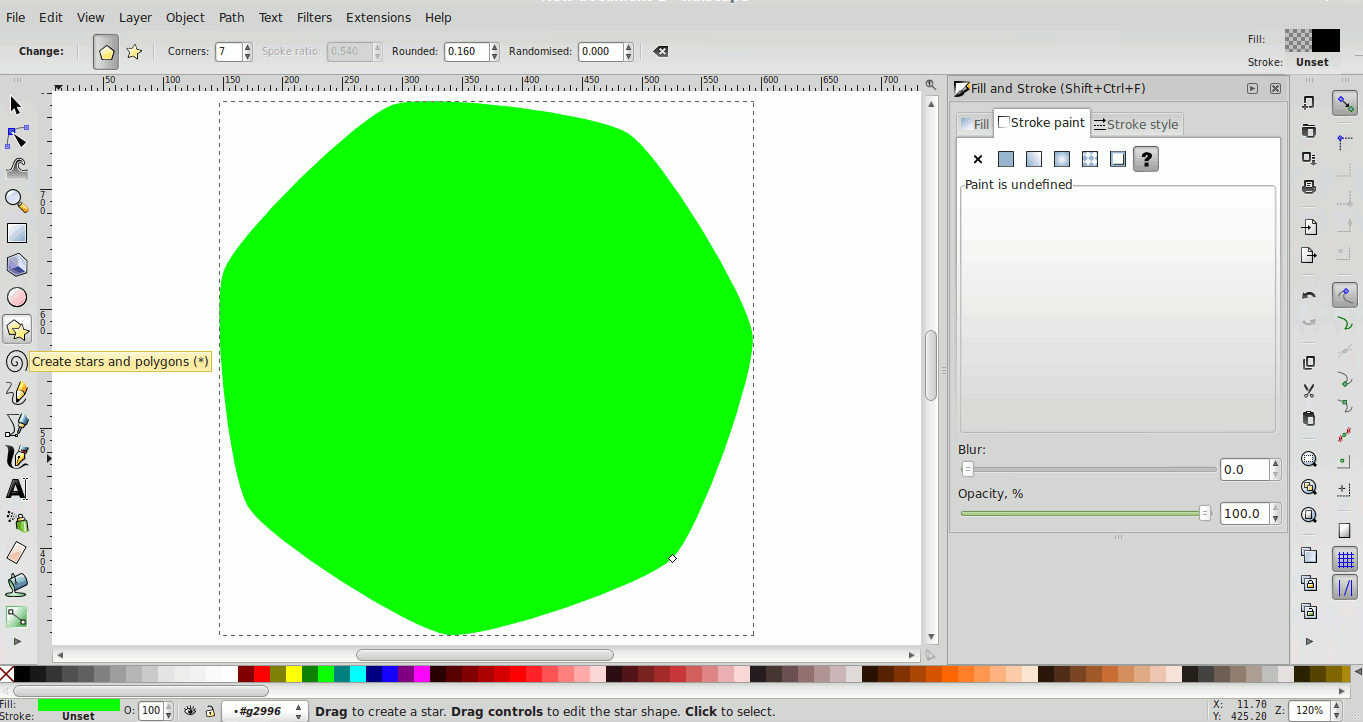
For example, suppose you want to draw a seven-sided shape. Click on the “Create stars and polygons” button on the left. At the top of the screen you’ll now see buttons for star and regular polygon and an option to set the number of corners. For stars you can choose the spoke ratio (how pointy the star is). You can also make the corners more or less curved, and scatter the corners and angles randomly.
Choose some initial settings, then draw your shape by dragging the mouse with the left button held down. Having drawn the shape, everything can be changed about it at any time.
To change the settings specific to that shape, click back on the “Create stars and polygons” button and then click on your shape. You can do pretty much anything. Want a dodecahedron instead of a star? Click on the regular polygon button and change the number of corners to 12. Select a new colour from the palette at the bottom of the screen if you like. Click on the fill color (bottom left) to bring up the Fill and Stroke window giving all the color options, such as the ability to specify the color using RGB, CMYK or color wheel values.
Lines and curves
The ability to draw and edit – to any degree of precision – lines and curves sets Inkscape apart from more basic drawing packages.
From the left hand menu, select “Draw freehand lines” (the pencil icon) and just scribble a line. Now click on the second icon down (“Edit paths by nodes”) and click on your scribble. You’ll see that not only is it selected, but lots of small squares (“nodes”) have appeared along it.
From the pull-down menu select View > Zoom > Selection and Inkscape will immediately zoom so your selected line fills the screen (pressing the 3 button will do the same).
Now take a look at what you can do. Any node can be dragged to a new position, taking the line with it. Click on a node and you’ll see little circles appear with faint lines connected to that node and its neighbours. Drag the circles around the deform the line. Suppose you want to make a small section of the line straight between two nodes? Want to make one small section of your line straight? Hold down Shift and click to select the nodes, then click the “Make selected segments lines” button at the top.
Take a look at all the options with the buttons across the top: with practice, you can reshape the line in any way you want.
Of course, you don’t have to start off with a freehand line. Just below the “Draw freehand line” button is one saying “Draw Bezier curves and straight lines”. Again, having drawn your initial line, you can edit it to your heart’s content.
Gradients
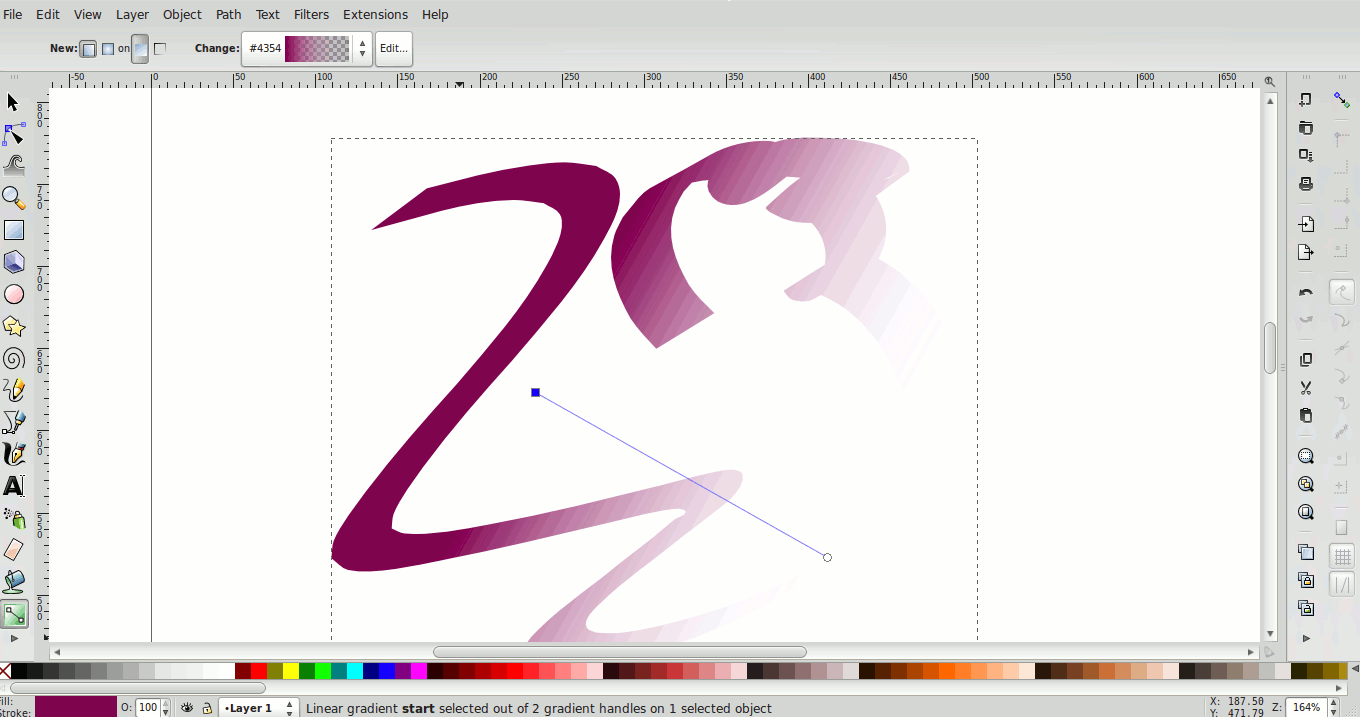
Here’s how to create a color gradient. Click on the “Draw calligraphic or brush strokes” button on the left and scribble a line (you could use any shape, but why not give this option a go).
Now click on the bottom button on the left hand side – “Create and edit gradients”. You can now drag a line across your new shape and see the gradient color appear. Move the line to adjust the gradient (and there are also settings at the top allowing you to further customise it).
Import and export
Inkscape is great for creating images from scratch, but it also allows you to import existing images – from SVG to jpg, png to PDF.
Files are imported within your existing image, allowing you to merge different graphics together.
By using the Path > Object to path option from the pull-down menu (with an imported object selected) you can convert the parts to paths which Inkscape can then work on.
In addition to the standard svg file format, Inkscape allows you to save a file as PDF or to export all or part of your creation to any standard graphics file format (jpg, png…).
Moving on
By giving you the primitives (shapes, lines, spirals, text, fills, gradients…) and allowing you to manipulate them to any degree: distorting, coloring, layering, joining, cloning and more, Inkscape provides a powerful tool.
This article has introduced some of the basic tools to give you a flavour, but it is only that – there’s a lot more to see and do in Inkscape.
As with many Free and Open Source tools, it’s not quite up there with the paid for alternatives, but if you don’t fancy spending several hundred dollars on Adobe Illustrator, Inkscape may be just what you’re looking for.


