If you’ve ever dreamed of creating the next Shrek or Kung Fu Panda, or even working on a more modest 3D modelling project, you’ll need a piece of software like Blender.
3D modelling is a specialist area, and there aren’t too many software players in the field. Commercial studios tend to use proprietary software like Autodesk Maya or 3ds Max (Maya has the edge for film making at the moment).
If you want to be using the same software as the big commercial players, you’ll need one of those – and you’ll need to be dipping into your pocket for at least $1000 if you want to use it for more than 90 days. But if you prefer your software to come with a cheaper price tag – $0 for example – then Blender almost certainly has all the features you’ll need.
Getting started
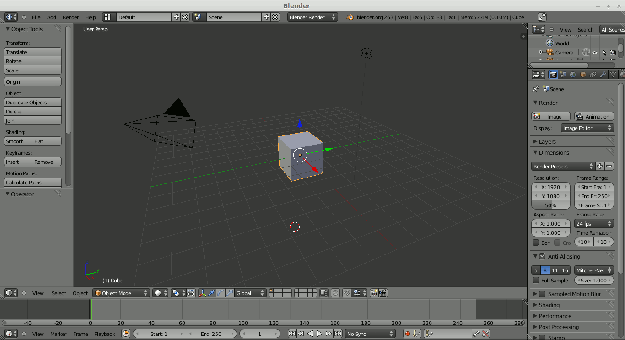
You can install Blender from the standard software repositories on every main Linux distro. Starting it up for the first time, the interface looks more than a little intimidating. Powerful software often does, and it’s worth taking a bit of time to find your way around.
Starting on the left of the screen, you have the toolbar, allowing you to manipulate objects: rotate, resize, change the surface appearance and so on.
In the centre of the window is the Viewport – where all the interesting things happen and you view and manipulate your creation.
Top-right is the Outliner – listing all your objects. As projects get more complicated and objects multiply, this tool becomes increasingly useful as you try to keep track of everything. Below the Outliner is the Properties panel.
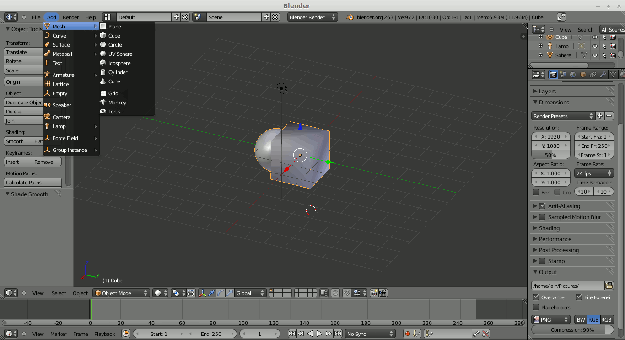
The pull-down menus at the top include the Add menu, allowing you to add a range of shapes, which can then be manipulated.
At the bottom of the screen is a timeline, allowing you to move to different frames for animation (if you are creating a static scene and not an animation, you can safely ignore the timeline).
3D graphics give you the ability to move your viewpoint and see how things look for any angle, direction or distance you choose.
You can quickly orbit around your creation by panning with the middle mouse button held down. Press Shift with the middle mouse to pan across.
The number pad allows you finer manipulation. These are the number keys normally on the right of the keyboard – not across the top. If you have a laptop without a separate number pad, you should be able to use the function key to access them on the keyboard.
Pressing + or – on the number pad zooms in and out. 4, 6 and 8 rotate the view. The 0 button gives you the camera view (i.e. what the camera is seeing on the Viewport). Note that the camera is an object on the screen and can be moved and rotated, allowing you to get just the shot you want for each frame. Lights are also objects you can add, move and adjust.
Sometimes you’ll want a particular 2D perspective for your work (there are occasions when you want to work in 2D, then switch back to 3D to check it looks how you want it to, for example). Pressing 7 on the number pad gives you the top view, 1 is the front view and 3 shows your creation from the side. Ctrl-1, 3 and 7 show the opposite (back, bottom, other side).
Creating your project
Blender allows you to build up a complex project from simple shapes. This gets pretty complicated very quickly, but luckily – as with all the best Open Source projects – there’s a strong user community that have put together a whole host of how-to videos (mostly on YouTube) so it’s always worth taking a look. Be aware that Blender had changed significantly over the years, so an older video may not tell you exactly how to achieve what you want on a new version of the software.
Let’s try something very basic, just to get a feel for it.
Click on the Viewport, then select Add > Mesh > UV Sphere from the drop-down menu at the top left. Hopefully, a sphere will appear on the screen, with a colored line around it to show it’s selected.
Hold down the left mouse button and drag the sphere so it overlaps with the cube you started with.
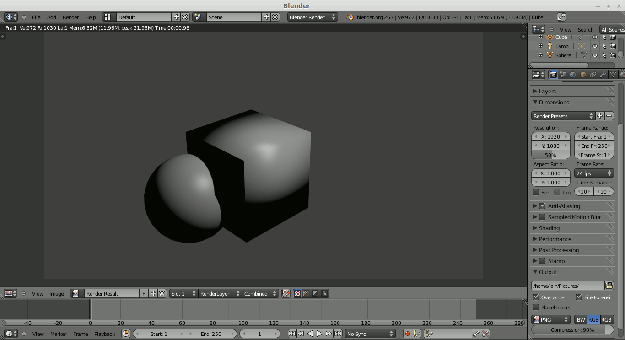
Now, holding down the Shift key, right-click on the cube and you should see both objects selected (the colored line goes around the outline of both). With the two selected, look on the toolbar on the left hand side. Click on the Join button, so Blender treats it as one object. Then click on Smooth under the Shading option.
Try moving your perspective to see the new shape from different positions.
Saving your image
Under the file pull-down menu you’ll find the usual options you’d expect to save your project in a format Blender understands. But what if you just want to save a jpg or png to import into Gimp or put on your website?
Click on the Viewport and hit 0 on the Number Pad for Camera View. On the right hand side look at the properties panel. Along the top of the panel are a series of icons – you want the left icon in the row to be selected (the camera icon).
Now scroll down the properties panel and second from bottom you’ll see the Output section. Select the file type to save as (e.g. PNG) and the directory to save your work into.
Next press F12 to render your image to the screen, then F3 to save it (you need to put in a filename and may still need to select the directory/folder to save it to).
Conclusion
Blender is a powerful piece of software. It may not quite be up there with the big players, but it’s free and has a strong community supporting and helping.
Blender suffers from the same problem as much Open Source Software built by enthusiasts for their own needs: it isn’t always simple or intuitive, nor does it take much notice of industry standard ways of doing things. That can be a real problem for professionals switching from an existing tool and goes some way to explaining why Blender hasn’t captured much market share: these things matter!
The instructions above on how to save an image are a good example. There’s a handy YouTube video you can watch on the topic, but it’s over eight minutes long. Any software for which it takes more than eight minutes to explain how to save a jpg probably isn’t as user friendly as it might be.
Use Blender expecting a steep learning curve and expecting to ask for help but with a willingness to persevere and you won’t be disappointed.


